Linux Tutorials

Using Openvpn Access Server to access your network from a remote location

In order to get Openvpn Access Server to allow ethernet bridging which will allow us to access our home network we must first install Openvpn Access Server. A tutorial by Digital Ocean is posted below that walks you through the Openvpn Access Server Setup. 

https://www.digitalocean.com/community/tutorials/openvpn-access-server-centos

Once the server is installed we want to to enable ethernet bridging on the setup page.

NOTE: In this article we are using port 943, Openvpn Access Server's default port. If you changed your port post installation then adjust accordingly to access the admin panel. 

  1. This can be done by logging into the admin side of the server using the domain/ip extension: mywebsite.com:943/admin
  2. Next we want to change the vpn mode to ethernet bridging which can be done my going to mywebsite.com:943/admin/vpn_mode
  3. The page should have two options, one for ethernet bridging and one for routing. We are going to choose the ethernet bridging option
  4. Once the option is selected press the save settings button at the bottom of the page and your server should be ready to go. 
  5. If your server's hostname is its ip address inside the network one may run into issues so it would probably be a good idea to check the server network settings available at: mywebsite.com:943/admin/server_network_settings
    1. For instance if your server's internal ip is 192.168.1.34 the vpn is going to have trouble connecting to it from outside the network. 
    2. Howerver, if your server's hostname/ip is something that is accessible from outside the network such as mywebsite.com or its external ip address the server should be good to go!

I hope this article helps you setup your Openvpn Access Server. If you have any question feel free to contact me at [email protected] or through the contact section of the website. 


Posted by admin in Linux Tutorials

Free SSL, CDN, and DDoS Protection from Cloudflare!

       Have you ever wanted to secure your website with SSL to protect it and its users from MITM (man in the middle attacks)? Or increase your load times from different parts of the world? Well now you can for a whopping cost of $0. That’s right for free!

       Ok, enough with the sales pitch if you want to do all of the above use cloudflare.com. CloudFlare hosts tons of websites ranging from first websites to websites with millions of users. The free plan provides you with basic DDoS protection, a CDN (content delivery network), a free SSL certificate, and much more. DDos protection will protect your website from crashing due to a high influx of users either created by hackers or innocently by people who just want to view your content.

      The setup is relatively simple as you just have to go to cloudflare.com, create an account, add your website, and then transfer your nameservers for your domain to the ones that will be provided by CloudFlare. It says that it takes a few hours to transfer your domain, but it really only takes a couple on minutes. Once it is all synced up you will be able to configure your server from the control panel. 

Here is a simple tutorial from Digital Ocean on how to integrate CloudFlare with a Digital Ocean Droplet: https://www.digitalocean.com/community/tutorials/how-to-mitigate-ddos-attacks-against-your-website-with-cloudflare 

Posted by admin, 0 comments

How to Create a Linode Server

If you have been looking around for a web hosting company that utilizes ssds you have probably heard of Digital Ocean.

Digital Ocean is a great web host but if you want some variety or if you want to try a different

all ssd hosting company you should check out Linode.

To learn more about pricing click the following link: https://www.linode.com/pricing

Posted by admin, 0 comments
Digital Ocean Vs Linode Speed Test

Digital Ocean Vs Linode Speed Test

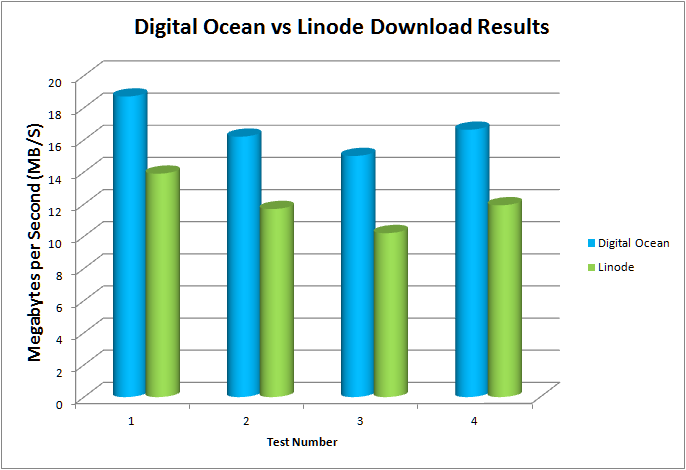
Hello everyone! Today we tested the download, disk write, and disk read speeds. Here is a data table with the results of the tests.

You can also download the PDF at the bottom of the page if you want to save it on your computer

        Speed in MB/s Speed in MB/s
Test Type Test Number Location Test Digital Ocean Linode
Download 1 Internet wget speeds from http://mirror.internode.on.net/pub/test/1000meg.test 18.7 13.9
Download 2 Internet wget speeds from http://mirror.internode.on.net/pub/test/1000meg.test 16.2 11.7
Download 3 Internet wget speeds from http://mirror.internode.on.net/pub/test/1000meg.test 15 10.2
      Average 16.63 11.93
           
Test Type Test Number Location Test Digital Ocean Linode
Write 1 Disk sync; dd if=/dev/disk of=tempfile bs=1M count=1024; sync 364 292
Write 2 Disk sync; dd if=/dev/disk of=tempfile bs=1M count=1024; sync 395 306
Write 3 Disk sync; dd if=/dev/disk of=tempfile bs=1M count=1024; sync 390 290
Write 4 Disk sync; dd if=/dev/disk of=tempfile bs=1M count=1024; sync 379 294
Write 5 Disk sync; dd if=/dev/disk of=tempfile bs=1M count=1024; sync 383 298
Write 6 Disk sync; dd if=/dev/disk of=tempfile bs=1M count=1024; sync 408 301
      Average 386.5 296.83
           
           
Test Type Test Number Location Test Digital Ocean Linode
Read 1 Disk dd if=tempfile of=/dev/null bs=1M count=1024 887 546
Read 2 Disk dd if=tempfile of=/dev/null bs=1M count=1024 1,228.80 642
Read 3 Disk dd if=tempfile of=/dev/null bs=1M count=1024 945 594
Read 4 Disk dd if=tempfile of=/dev/null bs=1M count=1024 1,126.40 582
Read 5 Disk dd if=tempfile of=/dev/null bs=1M count=1024 987 651
Read 6 Disk dd if=tempfile of=/dev/null bs=1M count=1024 1,126.40 692
      Average 1,050.10 617.83


Posted by admin, 0 comments